

aka’
Chroma keying for the Modeler
So you’ve shot cool photos of your spaceship model, but you want to take it to the next level and shoot some video and make an actual effects shot just like in the movies?
With that in mind, this tutorial series is an overview of the basics to making your own green or blue screen studio. A second series will follow up on the computer side with all the great footage you are about to capture. A potential third series would deal with integrating computer generated elements and other ‘advanced’ trickery. The second series is mostly ready now, but needs some more time from me to complete. The third series is in-mind, but many months away. Probably sometime in 2010/11 with my current work schedule.
So let’s get a little history… Chroma-keying is a technique first pioneered some 60 odd years ago. Nowadays, technology takes it from the hands of major film studios with major film budgets and brings into our home using standard computers and software.
So how about a definition. Chromakey(ing): ‘Chroma’ as in color, ‘Key’ as in a ‘keyhole’. One uses a color to punch a hole into an image, then insert whatever other image you want. One ‘pulls a key’ or ‘cuts a mask’. The process is commonly called green (or blue) screening due to the background color used. I will use the terms interchangeably.
Before we get too far though, let’s first clear up a few myths about greenscreening. One: it’s expensive. Two: It requires secret knowledge. Three: Greenscreening solves all your problems. As you will see, these notions are quite erroneous.
The first thing to know about chroma keying is that capturing the best image you can with the gear you’ve got is the be-all and end-all of the process. Every possible flaw mitigated up front saves massive hassle down the line and can be the difference between acceptable and stomping on all your gear in a fit of rage. 😉
While you could spend thousands of dollars on prosumer equipment (and still get frustratingly terrible results), I’ve put together a method costing tens of dollars that yields near ‘studio quality’ results. (Be very careful what you wish for!)
The intention is a cheap and disposable greenscreen operation for shooting miniatures in the home, scalable to you and your Time/Space/Money Continuum. Going low-end like this will also tell you if stepping up is worth your time and effort.
The series will be done with videos lasting from a one to ten minutes each.
————————————————————————————–
Series One
0. Reading Assignment
1. Introduction, Supplies and Costs, Color and Light
2. Setting up the screen
3. Lighting and Camera
4. The Shoot
5. Accessories, Tools and Upgrades
————————————————————————————–
Reading assignment.
Our reading assignment briefly covers some supply notes, a few thoughts on costs, the nature of light, color and temperature. It’s nothing tough. I’ve made efforts to make it as understandable as possible. Keeping this info in the back of your mind will dramatically improve your results and even put you ahead of many highly paid hollywood directors!
I. Introduction, Supplies and Costs, Color and Light.
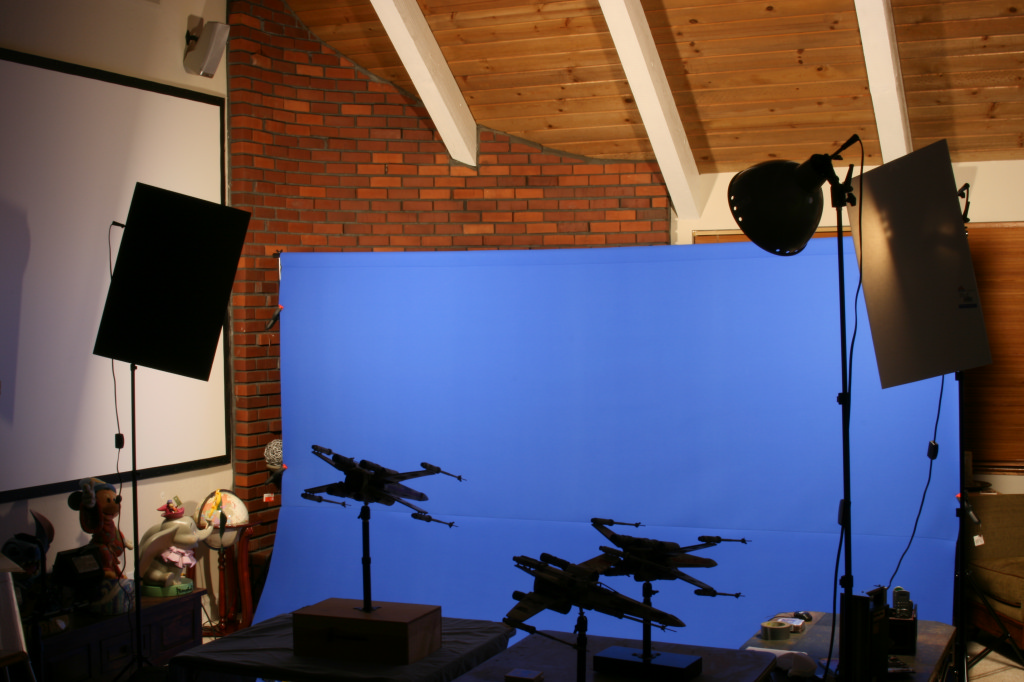
Here are two examples showing what’s possible depending on your budget.
This bluescreen stage is based off a higher-end situation, using professional level materials. Ballpark costs for the lights, stands and wall is less than $1500. There are many benefits to going to this level. But if you want to just dip your feet in and test the waters, clearly this setup is for the serious-minded person who already knows what he is going for.
This greenscreen stage was put together for under $100, using assets on hand as much as possible. The low cost is one benefit. There are downsides, but they can be minimized! This is a great way to see if you really want to step up to the next level!
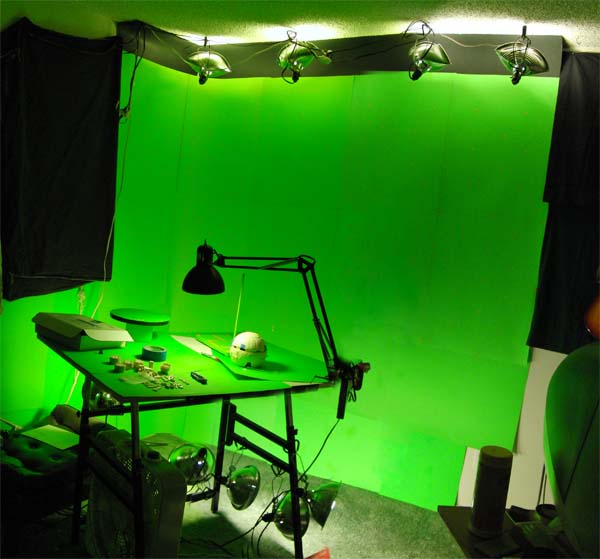
On-hand materials included the drafting table, desklamp, some of the bulbs, power strips and extension cords, gaffer’s tape, c-hooks and other minor materials.
Costs
I would say there are four price tiers. None of these includes the camera and related equipment, computer and software or any similar costs.
1. First up is the Clearly-Out-Of-The-Question Range by renting a proper film studio with stage crew. Figure several thousand dollars per day at a minimum.
2. Low-end-Professional will cost you ~$1000+ for the wall, lights and misc. support gear. You could easily see $5,000 for a ground up, basic, pro-level setup. It will be worth every penny, however it’s a very steep mountain of pennies.
3. Dropping down a financial notch to the sub-$1000 range, a can of Chroma Green or Chroma Blue can be bought for ~$50/gallon each. There are cheaper alternatives using ‘regular’ paint in the ~$20+/gallon range. This option likely requires landlord/spousal approval. You can also get fabric walls for ~$100 (cheaper is rarely better!). These require stands and other accessories, driving the price up to several hundred dollars. This is your best bet if you want a long term and hassle free situation for a few hundred to a thousand bucks.
4. As I’m apartment-bound and spend all my money on kits and bills, I went looking for a pseudo-pro setup at Cheap-o Brand prices. The following method let’s you build off materials you have on hand to determine how robust a setup you can do. Typically for $100 or less.
The cost is scalable, allowing you to up or downgrade as expenses allow. Whereas higher-end setups have large, up front, fixed costs, the following method is cheap and disposable with pay-as-you-go costs. The resulting quality, if you’ve setup as best you can, is not dissimilar to pro-level expenditures.
Here’s what you need.
The craft section at your local supermarket likely has neon green poster board for ~$1 each in the craft/paper supply section. Pharmacy chains and art stores will also likely have them. Under white light, this stuff reflects almost entirely green. The less red and blue in the overall tone, the easier it will be to key. Red, Green and Blue are known as ‘Color Channels’. More on this later.
Over the coarse of development, I’ve spent ~$50 on poster board, with 25 now on the wall, several on the table and a few for spares and tests. Look for neon green or a saturated blue (not dark or light). (In the end, you will want one wall of each color.) Different batches of poster board can be different tones. Make sure all your sheets are as consistent as possible.
Get some black sheets as well. Keep them as scratch free as possible.. They can be used to baffle light and act as cutoffs. White sheets can be used to bounce and diffuse light on the subject. If you want to put tracking markers on the wall, paper-punch a sheet of contrasting color such as neon orange. You could also paper-punch a regular sheet of aluminum kitchen foil.
Rubber cement. $2 each jar, get a couple.
“Clamp lamps” were $8 each and will light your wall. I’ve seen them at chain lumber stores for closer to $5. I’m running eight now, but could go to twenty if I expanded to another wall. You can start with two.
Desk Lamps on swing arms from a garage sale can go for $1. Or up to $25 at the store -if you don’t have them already. These will be your subject’s light source. You should have three, two can be ok, I’m using one right now. Consider different wattage bulbs depending on your shoot.
Generic 100w CFL Bulbs can go for $1 – $5 each. There are 150w bulbs for ~$10.
A roll of “Gaffer’s tape” (a basic staple of my home) is ~$15. Avoid duct tape in all,cases! Get Gaf at your local camera store. See the upcoming Camera and Lights section for more useful things to pick up while you are at the photo store.
A folding or drafting table. The adjustable height of a drafting table is a nice touch, but any simple table will work. Figure about $40, but quality can run up over $100. That is if you don’t have something around the house already.
An extension cord, ceiling hooks and a devoted power strip or three round off the setup.
Why Green?
The basic notion is that you select one color, delete and replace it with a new background fast and easy. This is called ‘keying’ in visual effects (vfx), but colloquially known as “greenscreening” or “bluescreening”.
If not for this trick, you would have to manually isolate your subject. In vfx, this is called ‘rotoscoping’ and has been around for some 90+ years. Keep this technique in mind, as it will help out on the computer side in Series 2.
Bluescreening has been around for at least 60+ years. Early television used green while films relied on blue for the technology of the time. Nowadays, the colors are interchangeable depending on the subject being shot.
There are three colors best for keying. In order they are: green, blue and the rarely used orange. Each tone is specifically chosen for its reflective frequency. The specific blue and green pigments are called ‘chroma blue’ and ‘chroma green’.
So while you could use a blue screen to shoot Doctor Who’s Tardis, going green is the better choice on that one. Conversely, you want to shoot Swamp Thing in front of a blue screen.
As Red occurs in earth and flesh tones, it is never used as a screen color! (Neon) Orange is sometimes used when blue and green are not feasible. The less natural the color, the better. The more primary the color, the better. Secondary colors occur in two color channels and are harder to key out.
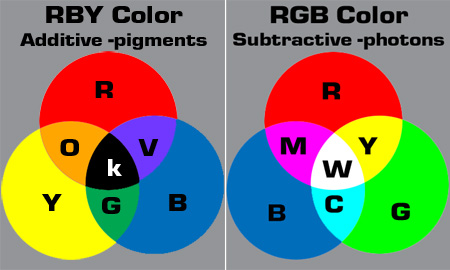
In painting, one uses pigment and you are likely familiar with the color wheel: Red, Blue and Yellow make the Secondary Colors of Green, Violet and Orange. Computers don’t use pigment, they use light. In this case, the primary colors are Red, Green and Blue (RGB). And rather than adding colors, you subtract colors from each other. There are also other color models (gamuts)such as CMYK, HSB, YCM, LAB and more. However, RGB is the one for our purposes.
Think of a prism. White light is broken into the full spectrum and is therefore the presence, or sum, of all colors, whereas black is absence of all color. If with pigments you add all colors together, you get a muddy muck. Mixing all pigments doesn’t yield black as pigments are impure by their nature. If there was such a thing as a pure pigment, you would get black. But even black pigment itself is not truly black otherwise you could not see it. Black pigment reflects light whereas true black (the absence of light) just keeps going and going and going.
As you may now be thinking, color is truly funky stuff. Let’s funk it up some more! Of the visible range, red has the longest frequency (waveform) and blue has the shortest (tightest). If you dig into the photoshop channels and look at each for any given image, you will note blue has the most ‘noise’ from it’s inherent sharpness and the red channel will be blurriest as the wavelength ‘smears’ over distance. So in a single photograph, none of the three channels will have the same exact image! Each color channel represents the subject at slightly different sizes and positions!
This does, rather conveniently, leave us with green as the moderate in the middle. It’s neither sharp nor as blurry as red or blue, and is also a primary color, (unlike the third keying choice of Orange). Can we improve on this? You bet!
Lights
From the mightiest stars to the lowest wattage light bulb, different light has different spectra. This can aid or hinder our situation.
Think of stars. The bluer they are, the hotter they burn. The redder they are, the cooler and orange they burn. Good ol’ Sol burns the nice yellow we are all familiar with.
So too with light bulbs.
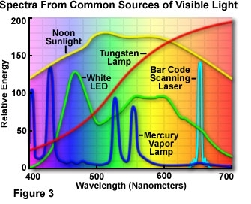
This page gives a nice and easy overview of light sources and even some history and is the source of the image above.
https://micro.magnet.fsu.edu/primer/lightandcolor/lightsourcesintro.html
Regular home incandescent bulbs burn very cool and orange, throwing most energy into the infrared spectrum as heat lost. They also have low color temperature. More on that in a bit.
For my setup, I’m using CFL (compact fluorescent) bulbs. CFL’s use 1/4 the energy of incandescent bulbs. Instead of the 1000 watts of energy I was looking at spending, I will get the ‘same light’ for ~250w! Nice! CFL’s also have beneficial spectra for our purposes as well.
Movie studios regularly have bank upon bank of arc lights using a hundred thousand watts for a single scene. When shooting miniatures, it is not uncommon for the lights to be so intense that the model ‘smokes’ after a few short seconds of exposure -and would erupt into flame not long afterwards if the scene isn’t cut! We aren’t going that intense, so no worries. But, 1000 watts of light will add some heat to your studio. Be prepared with fans.
Back to CFL’s.
CFL’s primarily burn Phosphor and Mercury. The phosphor throws most of its light in the UV range. The mercury reportedly brings most of it back into visible.
The upshot of this is:
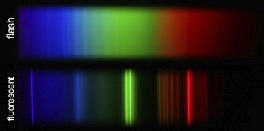
Whereas a camera flash gives a smooth spectrum, the fluorescent spikes in three spots, most strongly in the green. Convenient!
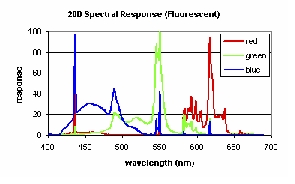
This gives nice saturated primary colors, but leaves the secondaries lacking. This makes the CFL great for greenscreening! However, these spikes must be smoothed out for the sake of your subject. The only way is with lens filters and or light ‘gels’. I will cover that under Cameras and Lights.
Color Temperature
So again, let’s think of stars.
The technical definition of color temperature includes the phrase ‘black body radiator’. Color temp involves the energy needed to get that black body to radiate at a particular intensity.
Thus a brown dwarf star has a very low color temperature as it barely glows at all. When they do glow, it is orange/red. Go to the other end and you encounter blue giants. These stars burn huge, bright, exceptionally hot and very blue.
Color temp is measured in kelvin degrees. Thus there are numbers like 9600k, 5500k, 3200k and so on. You will notice that your computer monitor has color temperature settings. The highest is ~9300k. Change the values and you will see the orange to blue casting occur.
Why is color temperature important? The eyeball is an amazing multi-capable thing. Whereas the camera, while a wonder in its own right, is not so versatile. Digital cameras need to be ‘white balanced’. That is, they must be told what is ‘white’. Film stock for a regular camera is pre-balanced for general or specific conditions (low light, astronomy, indoor/outdoor/hi speed and so on).
The temperature of Sunlight is in the 3300k-5500k range. Colors below this go orange, anything above goes blue. Therefore, flesh tones blend nicely at a lower 3000k. while something like car commercials are usually shot very hot. CFL temps are generally in the 2700 – 3000 kelvin range for any given brand of light bulb. Ideal, neutral, photography lighting is 5500k.
That’s how I have understood it to be. Here’s what wikipedia says about it for greater clarification with formulae and charts.
Color Temperature https://en.wikipedia.org/wiki/Color_temperature
Effective Temperature https://en.wikipedia.org/wiki/Effective_temperature
As mentioned above, CFL temps are generally in the 2700-3000 kelvin range for any given bulb. This means that no matter how many bulbs are used, the color temp will only average all the bulbs, ~2850k in this theoretical case. Adding more lights raises the ambient room temperature; candlelight power boosts and area coverage expands; but color temp never changes.
So you’re now thinking, if 5500k is ideal, then where do we get another 2500k to balance these CFL’s? The short answer is that you can’t -but you can compensate for it! This is what lens filters are for. When dealing with lights, they are called ‘gels’.
In my case, I’d like to keep that green CFL spike and cancel the red and blue spikes for the wall. Whereas on the subject lamps, all the spikes must be crushed for an even white light. Putting a filter on the camera in this case would affect both light sources. The solution is therefore to use a gel on the wall lamps that will amp the green spike and minimize the read an blue; and gel the subject lamps in such a way to smooth out the cfl spikes and boost the secondary colors for a nice smooth white light. I will get back to this subject a little bit later. Gels are/can be expensive and I want to keep this cheap (for now).
————————————————————————-
So this may all seem a bit much, but it is mostly something to reflect on and keep in the back of your mind as you proceed. It’s nothing to lose any sleep over and there are no quizzes. However, when you do go to setup your own ‘soundstage’, these notions should be a guiding principle!
Greenscreening is all about a smooth wall and smooth lighting. The smoother these two factors, the smoother your experience will be. It is always worth spending as much time up front getting the best possible setup you can. What can take moments to minutes up front will multiply into hours and days on the back end. Trust me on that.
And with that, allow me a few moments on my bio. I’m no expert at any of this. I’ve been in the vfx industry here in Hollywood for a nascent five years. Rather than jump in at a given level of work/specialty, I decided to start at the very bottom so I would have a complete and thorough understanding of every stage of the production pipeline.
In that time, I have seen some genuinely bad work from directors, producers and supervisors who, given their years and vast paychecks, should know far better. The common phrase is “We’ll fix it in post (production).” Well, I’m glad they do as that keeps me employed with a modest income. But the simplest of momentary fixes done ‘on set’ would have saved the production hundreds to thousands of dollars per instance! It’s a terrible fact, but there it is.
With that in mind, I began using the experience gained to do my own work with miniatures -a childhood dream since walking out of Star Wars back in ’77. So as I learn and gain insight into this process, I am happy to share the basics to help you folks out in your own ‘backyard’ efforts.
Contact me with any errata.
modelman@twinlitworlds.com.
Be well,
Tom
For more of my videos, check my youtube channel:
https://www.youtube.com/user/ModelManTom
On with the show!
[zdvideo]https://www.modelermagic.com/videos/TP/MMM_GS_01_Intro_v01.flv[/zdvideo] [zdvideo]https://www.modelermagic.com/videos/TP/MMM_GS_02_Repairs_v01.flv[/zdvideo] [zdvideo]https://www.modelermagic.com/videos/TP/MMM_GS_03_Track_v01.flv[/zdvideo] [zdvideo]https://www.modelermagic.com/videos/TP/MMM_GS_03.5_FullTest_v01.flv[/zdvideo] [zdvideo]https://www.modelermagic.com/videos/TP/MMM_GS_04A_Tonality_v01.flv[/zdvideo] [zdvideo]https://www.modelermagic.com/videos/TP/MMM_GS_04B_Filters_v01.flv[/zdvideo] [zdvideo]https://www.modelermagic.com/videos/TP/MMM_GS_04C_Exposure_v01.flv[/zdvideo] [zdvideo]https://www.modelermagic.com/videos/TP/MMM_GS_04.5_TweaksandIdeas_v01.flv[/zdvideo] [zdvideo]https://www.modelermagic.com/videos/TP/MMM_GS_05_TestResults_v01.flv[/zdvideo] [zdvideo]https://www.modelermagic.com/videos/TP/MMM_GS_06_Refinement_v01.flv[/zdvideo] [zdvideo]https://www.modelermagic.com/videos/TP/MMM_GS_07_Troubleshooting_v01.flv[/zdvideo] [zdvideo]https://www.modelermagic.com/videos/TP/MMM_GS_08_ClothAlternative.flv[/zdvideo]